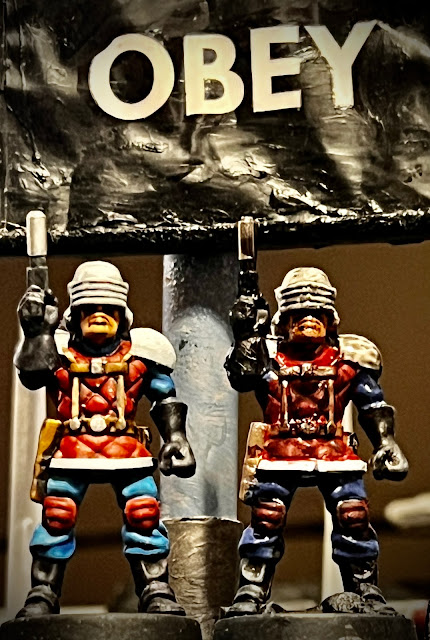
Tonight I spent several hours painting my Star Schlock astroguards, miniatures inspired by the pulpy SF movies and TV shows of the 1970s and 80s. The set came with one professionally painted astroguard, seen here at left; I painted the one on the right, doing my level best to duplicate the professional's efforts. And while my results aren't as good as those of the pro, I'm still pretty happy with myself for taking the time to try to get it right. My guy doesn't look bad in the photo, and on the table he looks even better.
It was interesting trying to guess the professional's approach. For my part, I primed all the astroguards with Leadbelcher, a silvery metallic paint. Then, I pained the white parts, the black parts, the red parts, the blue parts, and then the brown holsters and harnesses. After that, I used a blue ink wash for the blue parts, a red ink wash for the red parts, and Nuln Oil to ink wash the rest. Oh, I guess I did the skin in there somewhere too; near the beginning, I think.
Tomorrow night I'll create a little setpiece with the entire platoon and share that.


2 comments:
Sage brush advice as always! Just in case it makes a difference, I'm using spray primer, which SEEMS to go on pretty smooth and not clumpy to my eyes, but what do I know? Sure, more than I used to thanks to you and a couple of others, but the learning curve on painting seems to be essentially forever.
I've never considered using washes before applying the basecoats, though sometimes I drybrush over the wash to bring back some of the vibrance of the original pigment. Nor have I tried working light to dark. Two new techniques to learn!
I've never used a spray primer before. Maybe you don't have to sand it? I would anyway. On a wood panel, you can feel the difference right away between sanded and unsanded primer or gesso. I don't know about a figure, though.
Half of painting is colour management, but the other half is dealing with the physical properties of the medium, including learning the chemical effects the various painting techniques have with one another. Part of applying primer is to achieve a blank colour for you to paint on, but it also should provide a predictable physical/chemical starting point for laying on paint. The more layers of paint you use, the more you have to consider the reactive properties of each paint. Some will react more than others, and generally the farther you get from neutral earth tones the more you have to learn about how each of your paints will act.
In art school, you can spend weeks just painting grids so that you try out as many combinations of paint and primer as you can. On day one, you combine titanium white with all the rest of your palette, one at a time, to see what it does. The next day you do cadmium yellow with each paint to see what it does, and so on. Paint follows its own logic, and it's way different from straight-up colour theory such as what you might do on a computer screen. Eventually, you learn your own tricks for paint mixtures, things you do that nobody else does, even James Gurney.
In terms of putting a wash under a basecoat, that's underpainting. That's how you achieve vibrant colour (although you can try adding paint afterwards as well like you are doing). However, I'm thinking more about putting down washes in thin layers until the colour is even, and then painting details on top of that with opaque paint. Like, the cloth gets a number of wash coats, but the belt might get one or two and then you lay on an opaque paint layer for the leather, and drybrush the buckle.
Professional figure painters work very quickly, so their washes are probably a lot more opaque than mine. Thousands of hours (either theirs or an instructors') teach them the perfect consistency to lay on paint efficiently but keep it thin enough to be workable. 3D is a lot harder than 2D for paint management, so the videos you watch can be deceptive unless the painter is very good at explaining paint.
Post a Comment